サブエレメント
この Gateway が PollableChannel からメッセージを受信しているときは、グローバルなデフォルト Poller を提供するか、Poller サブエレメントを Job Launching Gateway に提供する必要があります。
Java
XML
次の例は、Java でポーラーを提供する方法を示しています。
@Bean
@ServiceActivator(inputChannel = "queueChannel", poller = @Poller(fixedRate="1000"))
public JobLaunchingGateway sampleJobLaunchingGateway() {
    JobLaunchingGateway jobLaunchingGateway = new JobLaunchingGateway(jobLauncher());
    jobLaunchingGateway.setOutputChannel(replyChannel());
    return jobLaunchingGateway;
}
次の例は、XML でポーラーを提供する方法を示しています。
<batch-int:job-launching-gateway request-channel="queueChannel"
    reply-channel="replyChannel" job-launcher="jobLauncher">
  <int:poller fixed-rate="1000">
</batch-int:job-launching-gateway>
情報メッセージでフィードバックを提供する
Spring Batch ジョブは長時間実行される可能性があるため、進行状況の情報を提供することが重要な場合がよくあります。例: バッチジョブの一部またはすべての部分が失敗した場合、利害関係者に通知する必要がある場合があります。Spring Batch は、以下を通じて収集されるこの情報をサポートします。
アクティブポーリング
イベント駆動型リスナー
Spring Batch ジョブを非同期で (たとえば、ジョブ起動ゲートウェイを使用して) 開始すると、JobExecution インスタンスが返されます。JobExplorer を使用して JobRepository から JobExecution の更新されたインスタンスを取得することにより、JobExecution.getJobId() を使用してステータスの更新を継続的にポーリングできます。ただし、これは最適ではないと考えられており、イベント駆動型のアプローチが推奨されます。
Spring Batch は、最も一般的に使用される 3 つのリスナーを含むリスナーを提供します。
StepListenerChunkListenerJobExecutionListener
次の図に示す例では、Spring Batch ジョブが StepExecutionListener で構成されています。Spring Integration は、イベントの前後に任意のステップを受け取り、処理します。例: Router を使用して、受信した StepExecution をインスペクションできます。その インスペクションの結果に基づいて、さまざまなことが発生する可能性があり (メッセージをメール送信チャネルアダプターにルーティングするなど)、何らかの条件に基づいてメール通知を送信できます。
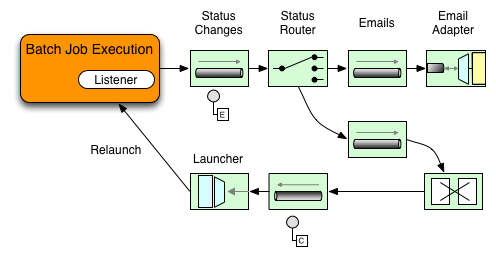
次の 2 つの部分の例は、StepExecution イベントのメッセージを Gateway に送信し、その出力を logging-channel-adapter に記録するようにリスナーを構成する方法を示しています。
まず、通知統合 Bean を作成します。
Java
XML
次の例は、Java で通知統合 Bean を作成する方法を示しています。
@Bean
@ServiceActivator(inputChannel = "stepExecutionsChannel")
public LoggingHandler loggingHandler() {
    LoggingHandler adapter = new LoggingHandler(LoggingHandler.Level.WARN);
    adapter.setLoggerName("TEST_LOGGER");
    adapter.setLogExpressionString("headers.id + ': ' + payload");
    return adapter;
}

@MessagingGateway(name = "notificationExecutionsListener", defaultRequestChannel = "stepExecutionsChannel")
public interface NotificationExecutionListener extends StepExecutionListener {}
@IntegrationComponentScan アノテーションを構成に追加する必要があります。 |
次の例は、XML で通知統合 Bean を作成する方法を示しています。
<int:channel id="stepExecutionsChannel"/>

<int:gateway id="notificationExecutionsListener"
    service-interface="org.springframework.batch.core.StepExecutionListener"
    default-request-channel="stepExecutionsChannel"/>

<int:logging-channel-adapter channel="stepExecutionsChannel"/>
次に、ジョブを変更して、ステップレベルのリスナーを追加します。
Java
XML
次の例は、Java でステップレベルのリスナーを追加する方法を示しています。
public Job importPaymentsJob(JobRepository jobRepository, PlatformTransactionManager transactionManager) {
    return new JobBuilder("importPayments", jobRepository)
        .start(new StepBuilder("step1", jobRepository)
                .chunk(200, transactionManager)
                .listener(notificationExecutionsListener())
                // ...
                .build();
              )
        .build();
}
次の例は、XML でステップレベルのリスナーを追加する方法を示しています。
<job id="importPayments">
    <step id="step1">
        <tasklet ../>
            <chunk ../>
            <listeners>
                <listener ref="notificationExecutionsListener"/>
            </listeners>
        </tasklet>
        ...
    </step>
</job>
非同期プロセッサー
非同期プロセッサーは、アイテムの処理をスケーリングできます。非同期プロセッサーの使用例では、AsyncItemProcessor はディスパッチャーとして機能し、新しいスレッドでアイテムの ItemProcessor のロジックを実行します。項目が完了すると、Future が AsyncItemWriter に渡されて書き込まれます。
非同期アイテム処理を使用してパフォーマンスを向上させることができ、基本的に fork-join シナリオを実装できます。AsyncItemWriter は結果を収集し、すべての結果が利用可能になるとすぐにチャンクを書き戻します。
Java
XML
次の例は、Java で AsyncItemProcessor を構成する方法を示しています。
@Bean
public AsyncItemProcessor processor(ItemProcessor itemProcessor, TaskExecutor taskExecutor) {
    AsyncItemProcessor asyncItemProcessor = new AsyncItemProcessor();
    asyncItemProcessor.setTaskExecutor(taskExecutor);
    asyncItemProcessor.setDelegate(itemProcessor);
    return asyncItemProcessor;
}
次の例は、XML で AsyncItemProcessor を構成する方法を示しています。
<bean id="processor"
    class="org.springframework.batch.integration.async.AsyncItemProcessor">
  <property name="delegate">
    <bean class="your.ItemProcessor"/>
  </property>
  <property name="taskExecutor">
    <bean class="org.springframework.core.task.SimpleAsyncTaskExecutor"/>
  </property>
</bean>
delegate プロパティは ItemProcessor Bean を参照し、taskExecutor プロパティは選択した TaskExecutor を参照します。
Java
XML
次の例は、Java で AsyncItemWriter を構成する方法を示しています。
@Bean
public AsyncItemWriter writer(ItemWriter itemWriter) {
    AsyncItemWriter asyncItemWriter = new AsyncItemWriter();
    asyncItemWriter.setDelegate(itemWriter);
    return asyncItemWriter;
}
次の例は、XML で AsyncItemWriter を構成する方法を示しています。
<bean id="itemWriter"
    class="org.springframework.batch.integration.async.AsyncItemWriter">
  <property name="delegate">
    <bean id="itemWriter" class="your.ItemWriter"/>
  </property>
</bean> この場合も、delegate プロパティは実際には ItemWriter Bean への参照です。
バッチプロセス実行の外部化
これまでに説明した統合アプローチは、Spring Integration が Spring Batch を外側のシェルのようにラップするユースケースを提案しています。ただし、Spring Batch は内部で Spring Integration を使用することもできます。このアプローチを使用することにより、Spring Batch ユーザーは、アイテムまたはチャンクの処理を外部プロセスに委譲できます。これにより、複雑な処理をオフロードできます。Spring Batch Integration は、以下の専用サポートを提供します。
リモートチャンキング
リモートパーティショニング
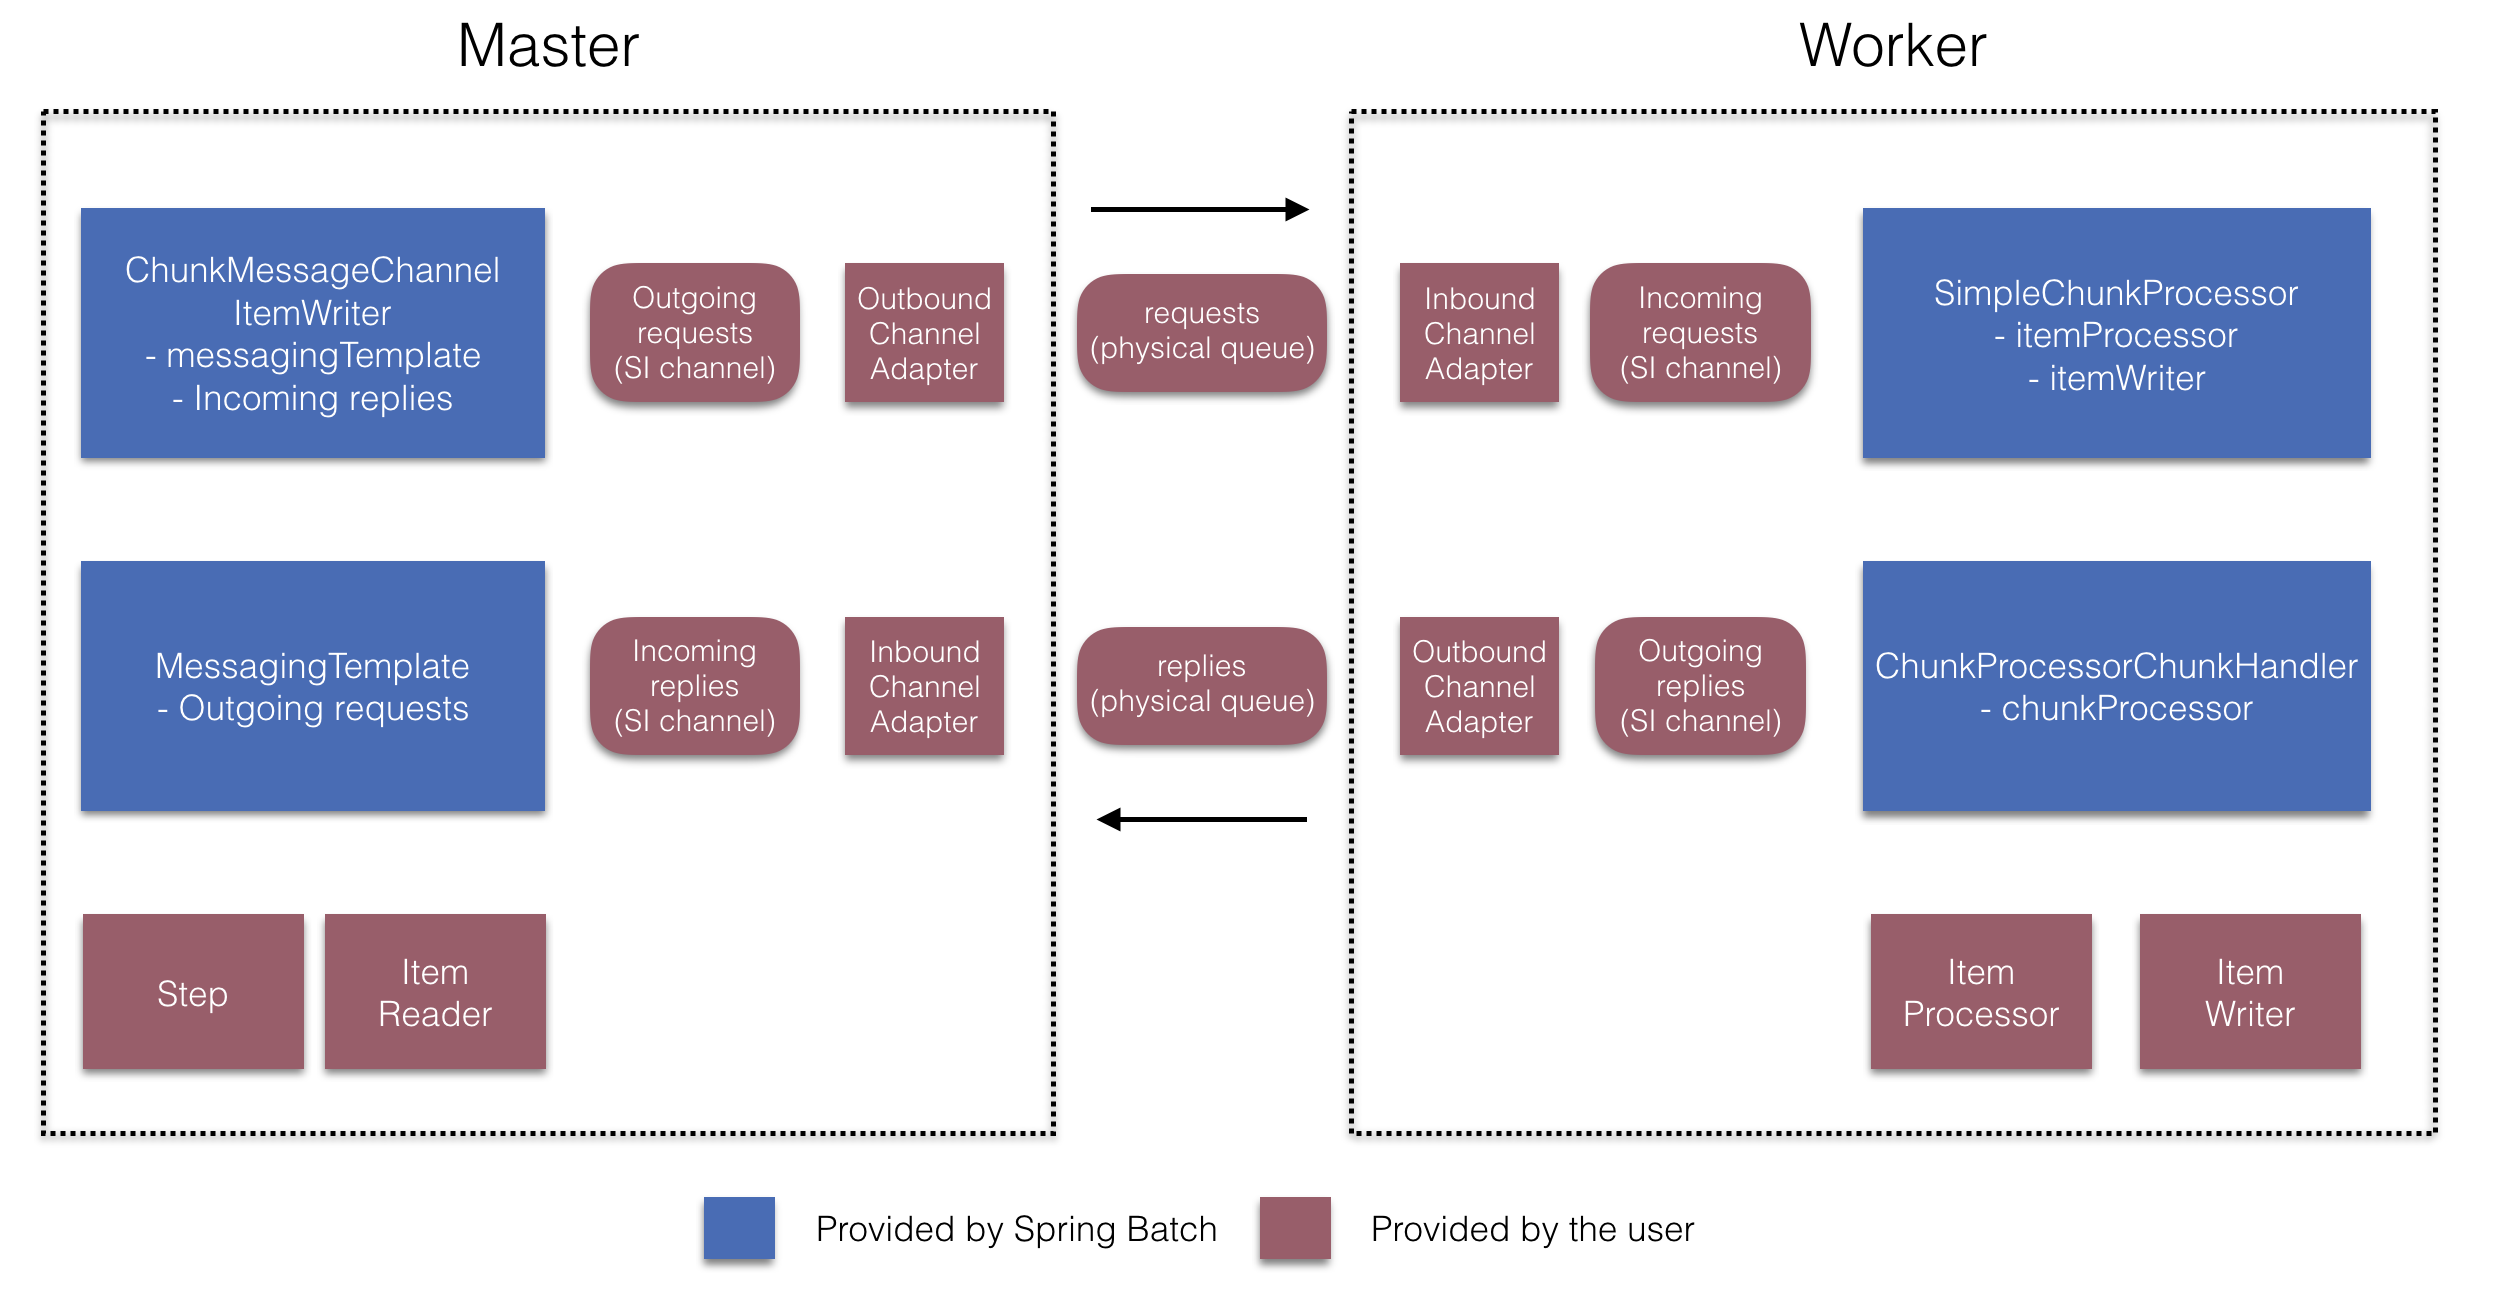
リモートチャンキング
次の図は、Spring Batch を Spring Integration と一緒に使用する場合に リモートチャンクが機能する 1 つの方法を示しています。
さらに一歩進んで、アイテムを送信して結果を収集する ChunkMessageChannelItemWriter (Spring Batch Integration が提供) を使用して、チャンク処理を外部化することもできます。送信されると、Spring Batch は結果を待たずに項目の読み取りとグループ化のプロセスを続行します。むしろ、結果を収集して Spring Batch プロセスに統合するのは ChunkMessageChannelItemWriter の責任です。
Spring Integration を使用すると、プロセスの同時実行性を完全に制御できます (たとえば、DirectChannel の代わりに QueueChannel を使用することにより)。さらに、Spring Integration の豊富なチャネルアダプター (JMS や AMQP など) のコレクションを利用することで、バッチジョブのチャンクを外部システムに分散して処理することができます。
Java
XML
リモートでチャンク化されるステップを持つジョブは、Java で次のような構成になる場合があります。
public Job chunkJob(JobRepository jobRepository, PlatformTransactionManager transactionManager) {
     return new JobBuilder("personJob", jobRepository)
             .start(new StepBuilder("step1", jobRepository)
                     .<Person, Person>chunk(200, transactionManager)
                     .reader(itemReader())
                     .writer(itemWriter())
                     .build())
             .build();
 }
リモートでチャンク化されるステップを持つジョブは、XML で次のような構成になる場合があります。
<job id="personJob">
  <step id="step1">
    <tasklet>
      <chunk reader="itemReader" writer="itemWriter" commit-interval="200"/>
    </tasklet>
    ...
  </step>
</job>
ItemReader 参照は、マネージャーでデータを読み取るために使用する Bean を指します。ItemWriter 参照は、前述のように、特別な ItemWriter ( ChunkMessageChannelItemWriter と呼ばれる) を指します。プロセッサー (存在する場合) は、ワーカーで構成されているため、マネージャー構成から除外されます。ユースケースを実装するときは、スロットル制限などの追加のコンポーネントプロパティを確認する必要があります。
Java
XML
次の Java 構成は、基本的なマネージャーのセットアップを提供します。
@Bean
public org.apache.activemq.ActiveMQConnectionFactory connectionFactory() {
    ActiveMQConnectionFactory factory = new ActiveMQConnectionFactory();
    factory.setBrokerURL("tcp://localhost:61616");
    return factory;
}

/*
 * Configure outbound flow (requests going to workers)
 */
@Bean
public DirectChannel requests() {
    return new DirectChannel();
}

@Bean
public IntegrationFlow outboundFlow(ActiveMQConnectionFactory connectionFactory) {
    return IntegrationFlow
            .from(requests())
            .handle(Jms.outboundAdapter(connectionFactory).destination("requests"))
            .get();
}

/*
 * Configure inbound flow (replies coming from workers)
 */
@Bean
public QueueChannel replies() {
    return new QueueChannel();
}

@Bean
public IntegrationFlow inboundFlow(ActiveMQConnectionFactory connectionFactory) {
    return IntegrationFlow
            .from(Jms.messageDrivenChannelAdapter(connectionFactory).destination("replies"))
            .channel(replies())
            .get();
}

/*
 * Configure the ChunkMessageChannelItemWriter
 */
@Bean
public ItemWriter<Integer> itemWriter() {
    MessagingTemplate messagingTemplate = new MessagingTemplate();
    messagingTemplate.setDefaultChannel(requests());
    messagingTemplate.setReceiveTimeout(2000);
    ChunkMessageChannelItemWriter<Integer> chunkMessageChannelItemWriter
            = new ChunkMessageChannelItemWriter<>();
    chunkMessageChannelItemWriter.setMessagingOperations(messagingTemplate);
    chunkMessageChannelItemWriter.setReplyChannel(replies());
    return chunkMessageChannelItemWriter;
}
次の XML 構成は、基本的なマネージャーのセットアップを提供します。
<bean id="connectionFactory" class="org.apache.activemq.ActiveMQConnectionFactory">
  <property name="brokerURL" value="tcp://localhost:61616"/>
</bean>

<int-jms:outbound-channel-adapter id="jmsRequests" destination-name="requests"/>

<bean id="messagingTemplate"
    class="org.springframework.integration.core.MessagingTemplate">
  <property name="defaultChannel" ref="requests"/>
  <property name="receiveTimeout" value="2000"/>
</bean>

<bean id="itemWriter"
    class="org.springframework.batch.integration.chunk.ChunkMessageChannelItemWriter"
    scope="step">
  <property name="messagingOperations" ref="messagingTemplate"/>
  <property name="replyChannel" ref="replies"/>
</bean>

<int:channel id="replies">
  <int:queue/>
</int:channel>

<int-jms:message-driven-channel-adapter id="jmsReplies"
    destination-name="replies"
    channel="replies"/>
前述の構成により、多数の Bean が提供されます。ActiveMQ と、Spring Integration が提供する受信および送信の JMS アダプターを使用して、メッセージングミドルウェアを構成します。示されているように、ジョブステップによって参照される itemWriter Bean は、ChunkMessageChannelItemWriter を使用して、構成されたミドルウェアにチャンクを書き込みます。
次の例に示すように、ワーカー構成に進むことができます。
Java
XML
次の例は、Java でのワーカー構成を示しています。
@Bean
public org.apache.activemq.ActiveMQConnectionFactory connectionFactory() {
    ActiveMQConnectionFactory factory = new ActiveMQConnectionFactory();
    factory.setBrokerURL("tcp://localhost:61616");
    return factory;
}

/*
 * Configure inbound flow (requests coming from the manager)
 */
@Bean
public DirectChannel requests() {
    return new DirectChannel();
}

@Bean
public IntegrationFlow inboundFlow(ActiveMQConnectionFactory connectionFactory) {
    return IntegrationFlow
            .from(Jms.messageDrivenChannelAdapter(connectionFactory).destination("requests"))
            .channel(requests())
            .get();
}

/*
 * Configure outbound flow (replies going to the manager)
 */
@Bean
public DirectChannel replies() {
    return new DirectChannel();
}

@Bean
public IntegrationFlow outboundFlow(ActiveMQConnectionFactory connectionFactory) {
    return IntegrationFlow
            .from(replies())
            .handle(Jms.outboundAdapter(connectionFactory).destination("replies"))
            .get();
}

/*
 * Configure the ChunkProcessorChunkHandler
 */
@Bean
@ServiceActivator(inputChannel = "requests", outputChannel = "replies")
public ChunkProcessorChunkHandler<Integer> chunkProcessorChunkHandler() {
    ChunkProcessor<Integer> chunkProcessor
            = new SimpleChunkProcessor<>(itemProcessor(), itemWriter());
    ChunkProcessorChunkHandler<Integer> chunkProcessorChunkHandler
            = new ChunkProcessorChunkHandler<>();
    chunkProcessorChunkHandler.setChunkProcessor(chunkProcessor);
    return chunkProcessorChunkHandler;
}
次の例は、XML でのワーカー構成を示しています。
<bean id="connectionFactory" class="org.apache.activemq.ActiveMQConnectionFactory">
  <property name="brokerURL" value="tcp://localhost:61616"/>
</bean>

<int:channel id="requests"/>
<int:channel id="replies"/>

<int-jms:message-driven-channel-adapter id="incomingRequests"
    destination-name="requests"
    channel="requests"/>

<int-jms:outbound-channel-adapter id="outgoingReplies"
    destination-name="replies"
    channel="replies">
</int-jms:outbound-channel-adapter>

<int:service-activator id="serviceActivator"
    input-channel="requests"
    output-channel="replies"
    ref="chunkProcessorChunkHandler"
    method="handleChunk"/>

<bean id="chunkProcessorChunkHandler"
    class="org.springframework.batch.integration.chunk.ChunkProcessorChunkHandler">
  <property name="chunkProcessor">
    <bean class="org.springframework.batch.core.step.item.SimpleChunkProcessor">
      <property name="itemWriter">
        <bean class="io.spring.sbi.PersonItemWriter"/>
      </property>
      <property name="itemProcessor">
        <bean class="io.spring.sbi.PersonItemProcessor"/>
      </property>
    </bean>
  </property>
</bean>
これらの構成項目のほとんどは、マネージャー構成からおなじみのはずです。ワーカーは、Spring Batch JobRepository または実際のジョブ構成ファイルにアクセスする必要はありません。対象のメイン Bean は chunkProcessorChunkHandler です。ChunkProcessorChunkHandler の chunkProcessor プロパティは、構成済みの SimpleChunkProcessor を取ります。これは、マネージャーからチャンクを受け取ったときにワーカーで実行される ItemWriter (およびオプションで ItemProcessor)への参照を提供する場所です。
詳細については、リモートチャンキングの「スケーラビリティ」の章のセクションを参照してください。
バージョン 4.1 から、Spring Batch Integration は リモートチャンキング設定を簡素化するために使用できる @EnableBatchIntegration アノテーションを導入します。このアノテーションは、アプリケーションコンテキストでオートワイヤできる 2 つの Bean を提供します。
RemoteChunkingManagerStepBuilderFactory: マネージャーのステップを構成しますRemoteChunkingWorkerBuilder: リモートワーカー統合フローを設定します
これらの API は、次の図に示すように、多数のコンポーネントの構成を処理します。
マネージャー側では、RemoteChunkingManagerStepBuilderFactory を使用して、以下を宣言することでマネージャーステップを構成できます。
アイテムを読み取って ワーカーに送信するためのアイテムリーダー
ワーカーにリクエストを送信するための出力チャネル (「発信リクエスト」)
ワーカーからの応答を受信するための入力チャネル (「受信応答」)
ChunkMessageChannelItemWriter および MessagingTemplate を明示的に構成する必要はありません。(そうする理由が見つかれば、明示的に設定することもできます)。
ワーカー側では、RemoteChunkingWorkerBuilder を使用して ワーカーを次のように構成できます。
入力チャネルでマネージャーから送信されたリクエストをリッスンする (“受信リクエスト”)
設定された
ItemProcessorおよびItemWriterを使用して、リクエストごとにChunkProcessorChunkHandlerのhandleChunkメソッドを呼び出します。出力チャネルで返信 (「送信返信」) をマネージャーに送信する
SimpleChunkProcessor および ChunkProcessorChunkHandler を明示的に構成する必要はありません。(そうする理由が見つかれば、明示的に設定することもできます)。
次の例は、これらの API の使用方法を示しています。
@EnableBatchIntegration
@EnableBatchProcessing
public class RemoteChunkingJobConfiguration {

    @Configuration
    public static class ManagerConfiguration {

        @Autowired
        private RemoteChunkingManagerStepBuilderFactory managerStepBuilderFactory;

        @Bean
        public TaskletStep managerStep() {
            return this.managerStepBuilderFactory.get("managerStep")
                       .chunk(100)
                       .reader(itemReader())
                       .outputChannel(requests()) // requests sent to workers
                       .inputChannel(replies())   // replies received from workers
                       .build();
        }

        // Middleware beans setup omitted

    }

    @Configuration
    public static class WorkerConfiguration {

        @Autowired
        private RemoteChunkingWorkerBuilder workerBuilder;

        @Bean
        public IntegrationFlow workerFlow() {
            return this.workerBuilder
                       .itemProcessor(itemProcessor())
                       .itemWriter(itemWriter())
                       .inputChannel(requests()) // requests received from the manager
                       .outputChannel(replies()) // replies sent to the manager
                       .build();
        }

        // Middleware beans setup omitted

    }

}リモートチャンクジョブの完全な例については、こちらを参照してください [GitHub] (英語) 。
リモートパーティショニング
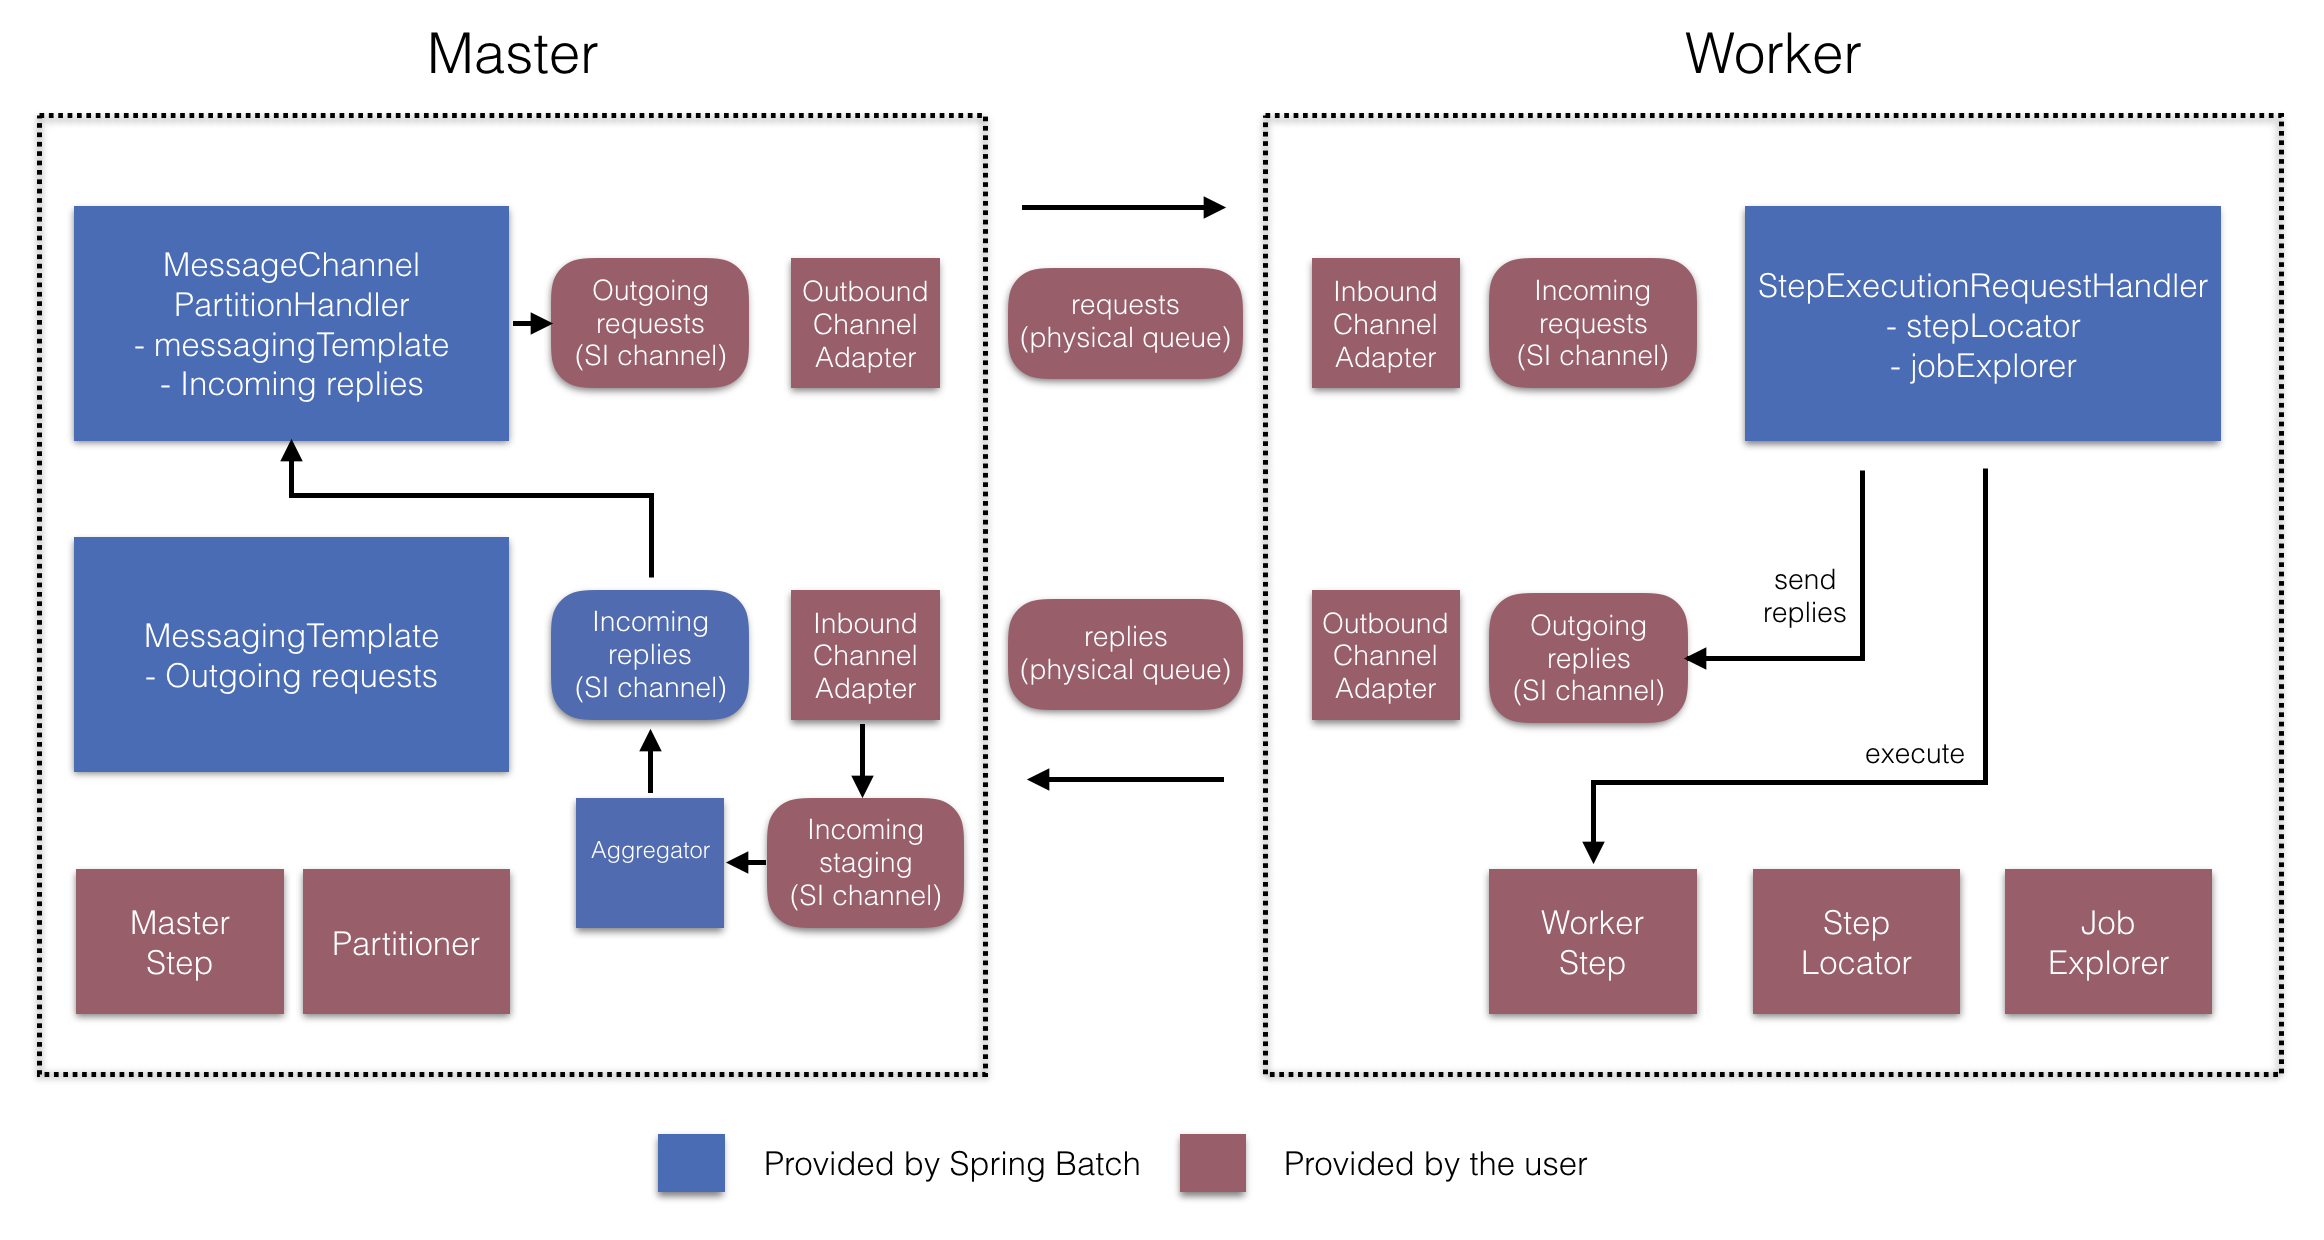
次の図は、典型的な リモートパーティショニングの状況を示しています。

一方、リモートパーティショニングは、ボトルネックの原因がアイテムの処理ではなく、関連する I/O である場合に役立ちます。リモートパーティショニングを使用すると、完全な Spring Batch ステップを実行する作業を ワーカーに送信できます。各 ワーカーには独自の ItemReader、ItemProcessor、ItemWriter があります。この目的のために、Spring Batch Integration は MessageChannelPartitionHandler を提供します。
PartitionHandler インターフェースのこの実装は、MessageChannel インスタンスを使用して、リモートワーカーに命令を送信し、そのレスポンスを受信します。これにより、リモートワーカーとの通信に使用されるトランスポート(JMS や AMQP など)からの優れた抽象化が提供されます。
リモートパーティショニングに対応する「スケーラビリティ」の章のセクションでは、リモートパーティショニングを構成するために必要な概念とコンポーネントの概要を説明し、デフォルトの TaskExecutorPartitionHandler を使用して実行の個別のローカルスレッドにパーティショニングする例を示します。複数の JVM への リモートパーティショニングには、次の 2 つの追加コンポーネントが必要です。
リモーティングファブリックまたはグリッド環境
目的のリモートファブリックまたはグリッド環境をサポートする
PartitionHandler実装
リモートチャンキングと同様に、JMS を「リモーティングファブリック」として使用できます。その場合、前述のように、PartitionHandler 実装として MessageChannelPartitionHandler インスタンスを使用します。
Java
XML
次の例では、既存のパーティション化されたジョブを想定し、Java での MessageChannelPartitionHandler および JMS 構成に焦点を当てています。
/*
 * Configuration of the manager side
 */
@Bean
public PartitionHandler partitionHandler() {
    MessageChannelPartitionHandler partitionHandler = new MessageChannelPartitionHandler();
    partitionHandler.setStepName("step1");
    partitionHandler.setGridSize(3);
    partitionHandler.setReplyChannel(outboundReplies());
    MessagingTemplate template = new MessagingTemplate();
    template.setDefaultChannel(outboundRequests());
    template.setReceiveTimeout(100000);
    partitionHandler.setMessagingOperations(template);
    return partitionHandler;
}

@Bean
public QueueChannel outboundReplies() {
    return new QueueChannel();
}

@Bean
public DirectChannel outboundRequests() {
    return new DirectChannel();
}

@Bean
public IntegrationFlow outboundJmsRequests() {
    return IntegrationFlow.from("outboundRequests")
            .handle(Jms.outboundGateway(connectionFactory())
                    .requestDestination("requestsQueue"))
            .get();
}

@Bean
@ServiceActivator(inputChannel = "inboundStaging")
public AggregatorFactoryBean partitioningMessageHandler() throws Exception {
    AggregatorFactoryBean aggregatorFactoryBean = new AggregatorFactoryBean();
    aggregatorFactoryBean.setProcessorBean(partitionHandler());
    aggregatorFactoryBean.setOutputChannel(outboundReplies());
    // configure other propeties of the aggregatorFactoryBean
    return aggregatorFactoryBean;
}

@Bean
public DirectChannel inboundStaging() {
    return new DirectChannel();
}

@Bean
public IntegrationFlow inboundJmsStaging() {
    return IntegrationFlow
            .from(Jms.messageDrivenChannelAdapter(connectionFactory())
                    .configureListenerContainer(c -> c.subscriptionDurable(false))
                    .destination("stagingQueue"))
            .channel(inboundStaging())
            .get();
}

/*
 * Configuration of the worker side
 */
@Bean
public StepExecutionRequestHandler stepExecutionRequestHandler() {
    StepExecutionRequestHandler stepExecutionRequestHandler = new StepExecutionRequestHandler();
    stepExecutionRequestHandler.setJobExplorer(jobExplorer);
    stepExecutionRequestHandler.setStepLocator(stepLocator());
    return stepExecutionRequestHandler;
}

@Bean
@ServiceActivator(inputChannel = "inboundRequests", outputChannel = "outboundStaging")
public StepExecutionRequestHandler serviceActivator() throws Exception {
    return stepExecutionRequestHandler();
}

@Bean
public DirectChannel inboundRequests() {
    return new DirectChannel();
}

public IntegrationFlow inboundJmsRequests() {
    return IntegrationFlow
            .from(Jms.messageDrivenChannelAdapter(connectionFactory())
                    .configureListenerContainer(c -> c.subscriptionDurable(false))
                    .destination("requestsQueue"))
            .channel(inboundRequests())
            .get();
}

@Bean
public DirectChannel outboundStaging() {
    return new DirectChannel();
}

@Bean
public IntegrationFlow outboundJmsStaging() {
    return IntegrationFlow.from("outboundStaging")
            .handle(Jms.outboundGateway(connectionFactory())
                    .requestDestination("stagingQueue"))
            .get();
}
次の例では、既存のパーティション化されたジョブを想定し、XML での MessageChannelPartitionHandler および JMS 構成に焦点を当てています。
<bean id="partitionHandler"
   class="org.springframework.batch.integration.partition.MessageChannelPartitionHandler">
  <property name="stepName" value="step1"/>
  <property name="gridSize" value="3"/>
  <property name="replyChannel" ref="outbound-replies"/>
  <property name="messagingOperations">
    <bean class="org.springframework.integration.core.MessagingTemplate">
      <property name="defaultChannel" ref="outbound-requests"/>
      <property name="receiveTimeout" value="100000"/>
    </bean>
  </property>
</bean>

<int:channel id="outbound-requests"/>
<int-jms:outbound-channel-adapter destination="requestsQueue"
    channel="outbound-requests"/>

<int:channel id="inbound-requests"/>
<int-jms:message-driven-channel-adapter destination="requestsQueue"
    channel="inbound-requests"/>

<bean id="stepExecutionRequestHandler"
    class="org.springframework.batch.integration.partition.StepExecutionRequestHandler">
  <property name="jobExplorer" ref="jobExplorer"/>
  <property name="stepLocator" ref="stepLocator"/>
</bean>

<int:service-activator ref="stepExecutionRequestHandler" input-channel="inbound-requests"
    output-channel="outbound-staging"/>

<int:channel id="outbound-staging"/>
<int-jms:outbound-channel-adapter destination="stagingQueue"
    channel="outbound-staging"/>

<int:channel id="inbound-staging"/>
<int-jms:message-driven-channel-adapter destination="stagingQueue"
    channel="inbound-staging"/>

<int:aggregator ref="partitionHandler" input-channel="inbound-staging"
    output-channel="outbound-replies"/>

<int:channel id="outbound-replies">
  <int:queue/>
</int:channel>

<bean id="stepLocator"
    class="org.springframework.batch.integration.partition.BeanFactoryStepLocator" />
また、パーティション handler 属性が partitionHandler Bean にマップされていることを確認する必要があります。
Java
XML
次の例では、パーティション handler 属性を Java の partitionHandler にマップします。
	public Job personJob(JobRepository jobRepository) {
		return new JobBuilder("personJob", jobRepository)
				.start(new StepBuilder("step1.manager", jobRepository)
						.partitioner("step1.worker", partitioner())
						.partitionHandler(partitionHandler())
						.build())
				.build();
	}
次の例では、パーティション handler 属性を XML の partitionHandler にマップします。
<job id="personJob">
  <step id="step1.manager">
    <partition partitioner="partitioner" handler="partitionHandler"/>
    ...
  </step>
</job>リモートパーティショニングジョブの完全な例については、こちらを参照してください [GitHub] (英語) 。
@EnableBatchIntegration アノテーションを使用して、リモートパーティション設定を簡素化できます。このアノテーションは、リモートパーティショニングに役立つ 2 つの Bean を提供します。
RemotePartitioningManagerStepBuilderFactory: マネージャーのステップを構成しますRemotePartitioningWorkerStepBuilderFactory: ワーカーステップを構成します
これらの API は、次の図に示すように、多数のコンポーネントの構成を処理します。

マネージャー側では、RemotePartitioningManagerStepBuilderFactory を使用して、以下を宣言することでマネージャーステップを構成できます。
データの分割に使用される
Partitionerワーカーにリクエストを送信する出力チャネル (「発信リクエスト」)
ワーカーからの応答を受信する入力チャネル (「受信応答」) (返信集計を構成するとき)
ポーリング間隔とタイムアウトパラメーター (ジョブリポジトリのポーリングを構成する場合)
MessageChannelPartitionHandler と MessagingTemplate を明示的に構成する必要はありません。(そうする理由が見つかった場合は、明示的に構成することもできます)。
ワーカー側では、RemotePartitioningWorkerStepBuilderFactory を使用して ワーカーを次のように構成できます。
入力チャネルでマネージャーから送信されたリクエストをリッスンする (“受信リクエスト”)
リクエストごとに
StepExecutionRequestHandlerのhandleメソッドを呼び出す出力チャネルで返信 (「送信返信」) をマネージャーに送信する
StepExecutionRequestHandler を明示的に構成する必要はありません。(そうする理由が見つかった場合は、明示的に構成できます)。
次の例は、これらの API の使用方法を示しています。
@Configuration
@EnableBatchProcessing
@EnableBatchIntegration
public class RemotePartitioningJobConfiguration {

    @Configuration
    public static class ManagerConfiguration {

        @Autowired
        private RemotePartitioningManagerStepBuilderFactory managerStepBuilderFactory;

        @Bean
        public Step managerStep() {
                 return this.managerStepBuilderFactory
                    .get("managerStep")
                    .partitioner("workerStep", partitioner())
                    .gridSize(10)
                    .outputChannel(outgoingRequestsToWorkers())
                    .inputChannel(incomingRepliesFromWorkers())
                    .build();
        }

        // Middleware beans setup omitted

    }

    @Configuration
    public static class WorkerConfiguration {

        @Autowired
        private RemotePartitioningWorkerStepBuilderFactory workerStepBuilderFactory;

        @Bean
        public Step workerStep() {
                 return this.workerStepBuilderFactory
                    .get("workerStep")
                    .inputChannel(incomingRequestsFromManager())
                    .outputChannel(outgoingRepliesToManager())
                    .chunk(100)
                    .reader(itemReader())
                    .processor(itemProcessor())
                    .writer(itemWriter())
                    .build();
        }

        // Middleware beans setup omitted

    }

}
