<!DOCTYPE html>
<html xmlns="http://www.w3.org/1999/xhtml" xmlns:th="https://www.thymeleaf.org">
    <head>
        <title>Spring Security Example</title>
    </head>
    <body>
        <h1>Welcome!</h1>

        <p>Click <a th:href="@{/hello}">here</a> to see a greeting.</p>
    </body>
</html>Spring Boot ログイン画面
このガイドでは、Spring Security で保護されているリソースを使用して単純な Web アプリケーションを作成するプロセスを順を追って説明します。
構築するもの
固定のユーザーリストに基づくログインフォームを使用してページを保護する Spring MVC アプリケーションを構築します。
必要なもの
約 15 分
Eclipse STS や IntelliJ IDEA のような任意の IDE または VSCode のようなテキストエディター
Java 17 以降
コードを直接 IDE にインポートすることもできます。
本ガイドの完成までの流れ
ほとんどの Spring 入門ガイドと同様に、最初から始めて各ステップを完了するか、すでに慣れている場合は基本的なセットアップステップをバイパスできます。いずれにしても、最終的に動作するコードになります。
最初から始めるには、Spring Initializr から開始に進みます。
基本をスキップするには、次の手順を実行します。
このガイドのソースリポジトリをダウンロードして解凍するか、Git を使用してクローンを作成してください:
git clone https://github.com/spring-guides/gs-securing-web.gitgs-securing-web/initialに cd保護されていない Web アプリケーションを作成するにジャンプしてください。
完了したときは、gs-securing-web/complete のコードに対して結果を確認できます。
Spring Initializr から開始
IDE を使用する場合はプロジェクト作成ウィザードを使用します。IDE を使用せずにコマンドラインなどで開発する場合は、この事前に初期化されたプロジェクトからプロジェクトを ZIP ファイルとしてダウンロードできます。このプロジェクトは、このチュートリアルの例に合うように構成されています。
プロジェクトを手動で初期化するには:
IDE のメニューまたはブラウザーから Spring Initializr を開きます。アプリケーションに必要なすべての依存関係を取り込み、ほとんどのセットアップを行います。
Gradle または Maven のいずれかと、使用する言語を選択してください。
依存関係をクリックし、Spring Web と Thymeleaf を選択します。
生成をクリックします。
結果の ZIP ファイルをダウンロードします。これは、選択して構成された Web アプリケーションのアーカイブです。
| Eclipse や IntelliJ のような IDE は新規プロジェクト作成ウィザードから Spring Initializr の機能が使用できるため、手動での ZIP ファイルのダウンロードやインポートは不要です。 |
| プロジェクトを GitHub からフォークして、IDE または他のエディターで開くこともできます。 |
保護されていない Web アプリケーションを作成する
Web アプリケーションにセキュリティを適用する前に、保護する Web アプリケーションが必要です。このセクションでは、簡単な Web アプリケーションを作成する方法を説明します。次に、次のセクションで Spring Security で保護します。
Web アプリケーションには、ホームページと "Hello, World" ページの 2 つの単純なビューが含まれています。ホームページは、次の Thymeleaf テンプレート(src/main/resources/templates/home.html から)で定義されています。
この単純なビューには、/hello ページへのリンクが含まれています。このページは、次の Thymeleaf テンプレートで定義されています(src/main/resources/templates/hello.html から)。
<!DOCTYPE html>
<html xmlns="http://www.w3.org/1999/xhtml" xmlns:th="https://www.thymeleaf.org">
    <head>
        <title>Hello World!</title>
    </head>
    <body>
        <h1>Hello world!</h1>
    </body>
</html>
この Web アプリケーションは Spring MVC に基づいています。そのため、Spring MVC を設定し、これらのテンプレートを公開するためのビューコントローラーを設定する必要があります。以下のリストは、アプリケーション内で Spring MVC を設定するクラスを示しています。
Java
package com.example.securingweb;

import org.springframework.context.annotation.Configuration;
import org.springframework.web.servlet.config.annotation.ViewControllerRegistry;
import org.springframework.web.servlet.config.annotation.WebMvcConfigurer;

@Configuration
class MvcConfig implements WebMvcConfigurer {

	@Override
	public void addViewControllers(ViewControllerRegistry registry) {
		registry.addViewController("/home").setViewName("home");
		registry.addViewController("/").setViewName("home");
		registry.addViewController("/hello").setViewName("hello");
		registry.addViewController("/login").setViewName("login");
	}

}
Kotlin
package com.example.securingweb

import org.springframework.context.annotation.Configuration
import org.springframework.web.servlet.config.annotation.ViewControllerRegistry
import org.springframework.web.servlet.config.annotation.WebMvcConfigurer

@Configuration
class MvcConfig : WebMvcConfigurer {
    override fun addViewControllers(registry: ViewControllerRegistry) {
        registry.addViewController("/home").setViewName("home")
        registry.addViewController("/").setViewName("home")
        registry.addViewController("/hello").setViewName("hello")
        registry.addViewController("/login").setViewName("login")
    }
}
addViewControllers() メソッド(WebMvcConfigurer の同じ名前のメソッドをオーバーライドする)は、4 つの View Controller を追加します。2 つの View Controller は、名前が home (home.html で定義)のビューを参照し、別の View Controller は hello (hello.html で定義)という名前のビューを参照します。4 番目の View Controller は、login という名前の別のビューを参照します。次のセクションでそのビューを作成します。
この時点で、"アプリケーションの実行" にジャンプして、何にもログインすることなくアプリケーションを実行できます。
セキュリティで保護されていない Web アプリケーションができたため、セキュリティを追加できます。
Spring Security をセットアップする
権限のないユーザーが /hello のグリーティングページを表示できないようにしたいとします。現在のように、訪問者がホームページのリンクをクリックすると、彼らを止める障壁のない挨拶が表示されます。訪問者がそのページを見る前にサインインすることを強制するバリアを追加する必要があります。
そのためには、アプリケーションで Spring Security を構成します。Spring Security がクラスパスにある場合、Spring Boot は「基本」認証ですべての HTTP エンドポイントを自動的に保護します。ただし、セキュリティ設定をさらにカスタマイズできます。最初に行う必要があるのは、Spring Security をクラスパスに追加することです。
Gradle では、次のように、build.gradle(.kts) ファイルの dependencies セクションに 3 行 (アプリケーション用に 1 行、Thymeleaf と Spring Security の統合用に 1 行、テスト用に 1 行) を追加する必要があります。
Groovy (build.gradle)
implementation 'org.springframework.boot:spring-boot-starter-security'
implementation 'org.thymeleaf.extras:thymeleaf-extras-springsecurity6'
testImplementation 'org.springframework.security:spring-security-test'
Kotlin (build.gradle.kts)
implementation("org.springframework.boot:spring-boot-starter-security")
implementation("org.thymeleaf.extras:thymeleaf-extras-springsecurity6")
testImplementation("org.springframework.boot:spring-boot-starter-security-test")
次のリストは、完成した build.gradle(.kts) ファイルを示しています。
Groovy (build.gradle)
plugins {
	id 'java'
	id 'org.springframework.boot' version '4.0.7'
	id 'io.spring.dependency-management' version '1.1.7'
}

group = 'com.example'
version = '0.0.1-SNAPSHOT'

java {
	toolchain {
		languageVersion = JavaLanguageVersion.of(17)
	}
}

repositories {
	mavenCentral()
}

dependencies {
	implementation 'org.springframework.boot:spring-boot-starter-webmvc'
	implementation 'org.springframework.boot:spring-boot-starter-thymeleaf'
	implementation 'org.springframework.boot:spring-boot-starter-security'
	implementation 'org.thymeleaf.extras:thymeleaf-extras-springsecurity6'
	testImplementation 'org.springframework.security:spring-security-test'
	testImplementation 'org.springframework.boot:spring-boot-starter-test'
	testImplementation 'org.springframework.boot:spring-boot-starter-security-test'
	testImplementation 'org.springframework.boot:spring-boot-starter-webmvc-test'
}

test {
	useJUnitPlatform()
}
Kotlin (build.gradle.kts)
plugins {
    id("org.springframework.boot") version "4.0.0"
    id("io.spring.dependency-management") version "1.1.7"
    kotlin("jvm") version "2.2.21"
    kotlin("plugin.spring") version "2.2.21"
}

group = "com.example"
version = "0.0.1-SNAPSHOT"

java {
    toolchain {
        languageVersion = JavaLanguageVersion.of(17)
    }
}

repositories {
    mavenCentral()
}

dependencies {
    implementation("org.springframework.boot:spring-boot-starter-webmvc")
    implementation("org.springframework.boot:spring-boot-starter-thymeleaf")
    implementation("org.jetbrains.kotlin:kotlin-reflect")
    implementation("org.springframework.boot:spring-boot-starter-security")
    implementation("org.thymeleaf.extras:thymeleaf-extras-springsecurity6")
    testImplementation("org.springframework.boot:spring-boot-starter-security-test")
    testImplementation("org.springframework.boot:spring-boot-starter-test")
    testImplementation("org.springframework.boot:spring-boot-starter-webmvc-test")
}

kotlin {
    compilerOptions {
        freeCompilerArgs.addAll("-Xjsr305=strict", "-Xannotation-default-target=param-property")
    }
}

tasks.withType<Test> {
    useJUnitPlatform()
}
Maven では、次のように、pom.xml の <dependencies> 要素に 2 つの追加エントリ(アプリケーション用とテスト用)を追加する必要があります。
<dependency>
	<groupId>org.springframework.boot</groupId>
	<artifactId>spring-boot-starter-security</artifactId>
</dependency>
<dependency>
	<groupId>org.thymeleaf.extras</groupId>
	<artifactId>thymeleaf-extras-springsecurity6</artifactId>
</dependency>
<dependency>
	<groupId>org.springframework.boot</groupId>
	<artifactId>spring-boot-starter-security-test</artifactId>
	<scope>test</scope>
</dependency>
次のリストは、完成した pom.xml ファイルを示しています。
<?xml version="1.0" encoding="UTF-8"?>
<project xmlns="http://maven.apache.org/POM/4.0.0" xmlns:xsi="http://www.w3.org/2001/XMLSchema-instance"
	xsi:schemaLocation="http://maven.apache.org/POM/4.0.0 https://maven.apache.org/xsd/maven-4.0.0.xsd">
	<modelVersion>4.0.0</modelVersion>
	<parent>
		<groupId>org.springframework.boot</groupId>
		<artifactId>spring-boot-starter-parent</artifactId>
		<version>4.0.6</version>
		<relativePath/> <!-- lookup parent from repository -->
	</parent>
	<groupId>com.example</groupId>
	<artifactId>securing-web-complete</artifactId>
	<version>0.0.1-SNAPSHOT</version>

	<properties>
		<java.version>17</java.version>
	</properties>

	<dependencies>
		<dependency>
			<groupId>org.springframework.boot</groupId>
			<artifactId>spring-boot-starter-thymeleaf</artifactId>
		</dependency>
		<dependency>
			<groupId>org.springframework.boot</groupId>
			<artifactId>spring-boot-starter-webmvc</artifactId>
		</dependency>
		<dependency>
			<groupId>org.springframework.boot</groupId>
			<artifactId>spring-boot-starter-security</artifactId>
		</dependency>
		<dependency>
			<groupId>org.thymeleaf.extras</groupId>
			<artifactId>thymeleaf-extras-springsecurity6</artifactId>
		</dependency>
		<dependency>
			<groupId>org.springframework.boot</groupId>
			<artifactId>spring-boot-starter-security-test</artifactId>
			<scope>test</scope>
		</dependency>

		<dependency>
			<groupId>org.springframework.boot</groupId>
			<artifactId>spring-boot-starter-test</artifactId>
			<scope>test</scope>
		</dependency>
		<dependency>
			<groupId>org.springframework.boot</groupId>
			<artifactId>spring-boot-starter-webmvc-test</artifactId>
			<scope>test</scope>
		</dependency>
	</dependencies>

</project>
次のセキュリティ構成により、認証されたユーザーのみが秘密の挨拶を見ることができるようになります。
Java
package com.example.securingweb;

import org.springframework.context.annotation.Bean;
import org.springframework.context.annotation.Configuration;
import org.springframework.security.config.annotation.web.builders.HttpSecurity;
import org.springframework.security.config.annotation.web.configuration.EnableWebSecurity;
import org.springframework.security.config.annotation.web.configurers.LogoutConfigurer;
import org.springframework.security.core.userdetails.User;
import org.springframework.security.core.userdetails.UserDetails;
import org.springframework.security.core.userdetails.UserDetailsService;
import org.springframework.security.crypto.bcrypt.BCryptPasswordEncoder;
import org.springframework.security.crypto.password.PasswordEncoder;
import org.springframework.security.provisioning.InMemoryUserDetailsManager;
import org.springframework.security.web.SecurityFilterChain;

@Configuration
@EnableWebSecurity
class WebSecurityConfig {

	@Bean
	SecurityFilterChain securityFilterChain(HttpSecurity http) {
		// @formatter:off
		http
			.authorizeHttpRequests((requests) -> requests
				.requestMatchers("/", "/home").permitAll()
				.anyRequest().authenticated()
			)
			.formLogin((form) -> form
				.loginPage("/login")
				.permitAll()
			)
			.logout(LogoutConfigurer::permitAll);
		// @formatter:on

		return http.build();
	}

	@Bean
	PasswordEncoder passwordEncoder() {
		return new BCryptPasswordEncoder();
	}

	@Bean
	UserDetailsService userDetailsService(PasswordEncoder encoder) {
		String password = encoder.encode("password");
		UserDetails user = User.withUsername("user").password(password).roles("USER").build();
		return new InMemoryUserDetailsManager(user);
	}

}
Kotlin
package com.example.securingweb

import org.springframework.context.annotation.Bean
import org.springframework.context.annotation.Configuration
import org.springframework.security.config.annotation.web.builders.HttpSecurity
import org.springframework.security.config.annotation.web.configuration.EnableWebSecurity
import org.springframework.security.config.annotation.web.invoke
import org.springframework.security.core.userdetails.User
import org.springframework.security.core.userdetails.UserDetailsService
import org.springframework.security.crypto.bcrypt.BCryptPasswordEncoder
import org.springframework.security.crypto.password.PasswordEncoder
import org.springframework.security.provisioning.InMemoryUserDetailsManager
import org.springframework.security.web.SecurityFilterChain

@Configuration
@EnableWebSecurity
class WebSecurityConfig {

    @Bean
    fun securityFilterChain(http: HttpSecurity): SecurityFilterChain {
        http {
            // Kotlin security extensions allow concise DSL instead of builder-style lambdas
            authorizeHttpRequests {
                authorize("/", permitAll)
                authorize("/home", permitAll)
                authorize(anyRequest, authenticated)
            }
            formLogin {
                loginPage = "/login"
                permitAll()
            }
            logout {
                permitAll()
            }
        }

        return http.build()
    }

    @Bean
    fun passwordEncoder(): PasswordEncoder {
        return BCryptPasswordEncoder()
    }

    @Bean
    fun userDetailsService(): UserDetailsService {
        val encoder = BCryptPasswordEncoder()
        val user = User.builder()
            .username("user")
            .password(encoder.encode("password"))
            .roles("USER")
            .build()

        return InMemoryUserDetailsManager(user)
    }
}
WebSecurityConfig クラスには @EnableWebSecurity のアノテーションが付けられ、Spring Security の Web セキュリティサポートを有効にし、Spring MVC 統合を提供します。また、2 つの Bean を公開して、Web セキュリティ構成の詳細を設定します。
SecurityFilterChain Bean は、保護する URL パスと保護しない URL パスを定義します。具体的には、/ パスと /home パスは、認証を必要としないように構成されています。他のすべてのパスは認証する必要があります。
ユーザーが正常にログインすると、認証を必要とする以前にリクエストされたページにリダイレクトされます。カスタム /login ページ(loginPage() で指定されている)があり、誰でもそれを表示できます。
UserDetailsService Bean は、1 人のユーザーでメモリ内ユーザーストアをセットアップします。そのユーザーには、user のユーザー名、password のパスワード、および USER のロールが与えられます。
次に、ログインページを作成する必要があります。login ビュー用の View Controller がすでに存在するため、次のリスト(src/main/resources/templates/login.html から)が示すように、ログインビュー自体を作成するだけで済みます。
<!DOCTYPE html>
<html xmlns="http://www.w3.org/1999/xhtml" xmlns:th="https://www.thymeleaf.org">
    <head>
        <title>Spring Security Example </title>
    </head>
    <body>
        <div th:if="${param.error}">
            Invalid username and password.
        </div>
        <div th:if="${param.logout}">
            You have been logged out.
        </div>
        <form th:action="@{/login}" method="post">
            <div><label> User Name : <input type="text" name="username"/> </label></div>
            <div><label> Password: <input type="password" name="password"/> </label></div>
            <div><input type="submit" value="Sign In"/></div>
        </form>
    </body>
</html>
この Thymeleaf テンプレートは、ユーザー名とパスワードを取得して /login に投稿するフォームを提示します。構成されているように、Spring Security はそのリクエストをインターセプトし、ユーザーを認証するフィルターを提供します。ユーザーが認証に失敗すると、ページは /login?error にリダイレクトされ、ページに適切なエラーメッセージが表示されます。ログアウトに成功すると、アプリケーションが /login?logout に送信され、ページに適切な成功メッセージが表示されます。
最後に、現在のユーザー名を表示してサインアウトする方法を訪問者に提供する必要があります。これを行うには、次のリスト(src/main/resources/templates/hello.html から)が示すように、hello.html を更新して現在のユーザーに挨拶し、Sign Out フォームを含めます。
<!DOCTYPE html>
<html xmlns="http://www.w3.org/1999/xhtml" xmlns:th="https://www.thymeleaf.org"
      xmlns:sec="https://www.thymeleaf.org/thymeleaf-extras-springsecurity6">
    <head>
        <title>Hello World!</title>
    </head>
    <body>
        <h1 th:inline="text">Hello <span th:remove="tag" sec:authentication="name">thymeleaf</span>!</h1>
        <form th:action="@{/logout}" method="post">
            <input type="submit" value="Sign Out"/>
        </form>
    </body>
</html>
Thymeleaf の Spring Security との統合を使用して、ユーザー名を表示します。「サインアウト」フォームは POST を /logout に送信します。ログアウトに成功すると、ユーザーを /login?logout にリダイレクトします。
アプリケーションの実行
Spring Initializr はアプリケーションクラスを作成します。この場合、クラスを変更する必要はありません。次のリストはアプリケーションクラスを示しています。
Java
package com.example.securingweb;

import org.springframework.boot.SpringApplication;
import org.springframework.boot.autoconfigure.SpringBootApplication;

@SpringBootApplication
class SecuringWebApplication {

	public static void main(String[] args) {
		SpringApplication.run(SecuringWebApplication.class, args);
	}

}
Kotlin
package com.example.securingweb

import org.springframework.boot.autoconfigure.SpringBootApplication
import org.springframework.boot.runApplication

@SpringBootApplication
class SecuringWebApplication

fun main(args: Array<String>) {
    runApplication<SecuringWebApplication>(*args)
}
実行可能 JAR を構築する
コマンドラインから Gradle または Maven を使用してアプリケーションを実行できます。必要なすべての依存関係、クラス、リソースを含む単一の実行可能 JAR ファイルを構築して実行することもできます。実行可能な jar を構築すると、開発ライフサイクル全体、さまざまな環境などで、アプリケーションとしてサービスを簡単に提供、バージョン管理、デプロイできます。
Gradle を使用する場合、./gradlew bootRun を使用してアプリケーションを実行できます。または、次のように、./gradlew build を使用して JAR ファイルをビルドしてから、JAR ファイルを実行できます。
Maven を使用する場合、./mvnw spring-boot:run を使用してアプリケーションを実行できます。または、次のように、./mvnw clean package で JAR ファイルをビルドしてから、JAR ファイルを実行できます。
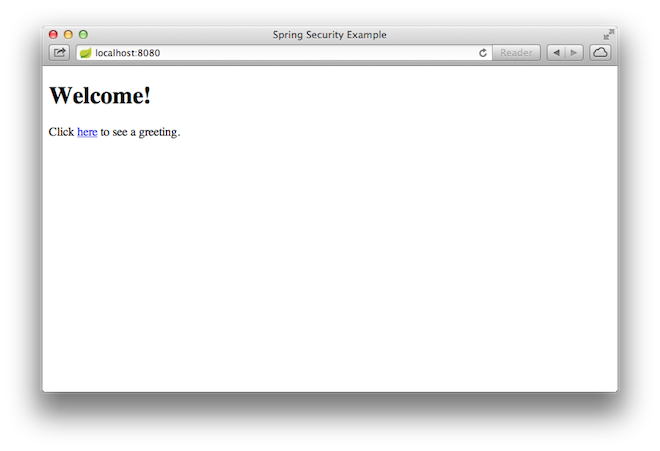
アプリケーションが起動したら、ブラウザーで http://localhost:8080 を指定します。次のイメージが示すように、ホームページが表示されます。
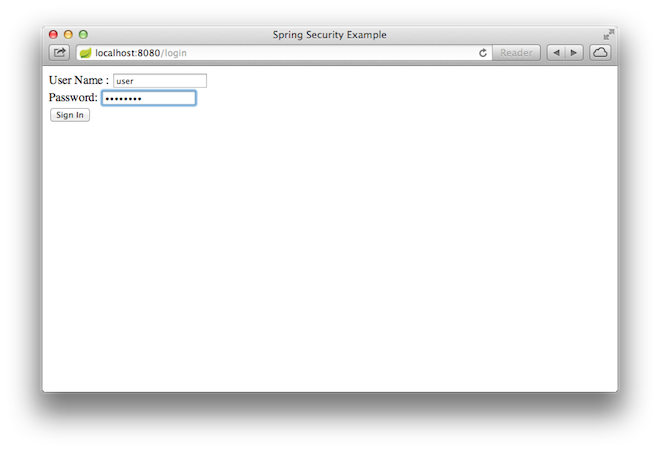
リンクをクリックすると、/hello のグリーティングページに移動しようとします。ただし、そのページは保護されており、まだログインしていないため、次のイメージに示すように、ログインページに移動します。
| セキュリティで保護されていないバージョンでここにジャンプした場合、ログインページは表示されません。セキュリティベースのコードの残りをバックアップして作成する必要があります。 |
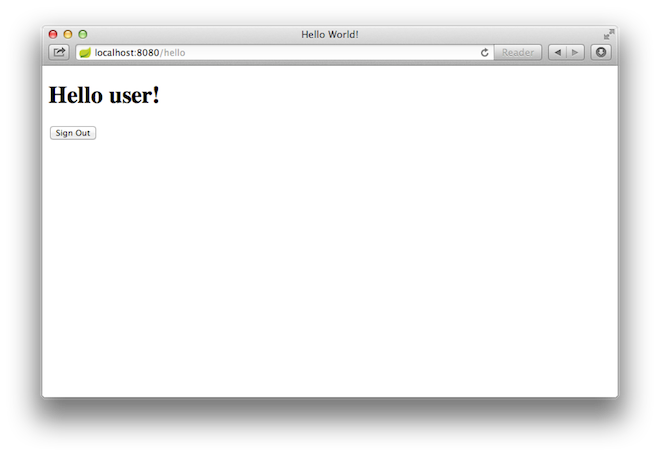
ログインページで、ユーザー名とパスワードのフィールドにそれぞれ user と password を入力して、テストユーザーとしてサインインします。ログインフォームを送信すると、認証され、次のイメージに示すようにグリーティングページに移動します。
サインアウトボタンをクリックすると、認証が取り消され、ログアウトされたことを示すメッセージとともにログインページに戻ります。
要約
おめでとう! Spring Security で保護された単純な Web アプリケーションを開発しました。
関連事項
次のガイドも役立つかもしれません:
新しいガイドを作成したり、既存のガイドに貢献したいですか? 投稿ガイドラインを参照してください [GitHub] (英語) 。
| すべてのガイドは、コード用の ASLv2 ライセンス、およびドキュメント用の帰属表示、NoDerivatives クリエイティブコモンズライセンス (英語) でリリースされています。 |