<?xml version="1.0" encoding="UTF-8"?>
<project xmlns="http://maven.apache.org/POM/4.0.0" xmlns:xsi="http://www.w3.org/2001/XMLSchema-instance"
	xsi:schemaLocation="http://maven.apache.org/POM/4.0.0 https://maven.apache.org/xsd/maven-4.0.0.xsd">
	<modelVersion>4.0.0</modelVersion>
	<parent>
		<groupId>org.springframework.boot</groupId>
		<artifactId>spring-boot-starter-parent</artifactId>
		<version>3.5.16</version>
		<relativePath/> <!-- lookup parent from repository -->
	</parent>
	<groupId>com.example</groupId>
	<artifactId>integration-complete</artifactId>
	<version>0.0.1-SNAPSHOT</version>
	<name>integration-complete</name>
	<description>Demo project for Spring Boot</description>

	<properties>
		<java.version>17</java.version>
	</properties>

	<dependencies>
		<dependency>
			<groupId>org.springframework.boot</groupId>
			<artifactId>spring-boot-starter-integration</artifactId>
		</dependency>
		<dependency>
			<groupId>org.springframework.integration</groupId>
			<artifactId>spring-integration-feed</artifactId>
		</dependency>
		<dependency>
			<groupId>org.springframework.integration</groupId>
			<artifactId>spring-integration-file</artifactId>
		</dependency>

		<dependency>
			<groupId>org.springframework.boot</groupId>
			<artifactId>spring-boot-starter-test</artifactId>
			<scope>test</scope>
		</dependency>
		<dependency>
			<groupId>org.springframework.integration</groupId>
			<artifactId>spring-integration-test</artifactId>
			<scope>test</scope>
		</dependency>
	</dependencies>

	<build>
		<plugins>
			<plugin>
				<groupId>org.springframework.boot</groupId>
				<artifactId>spring-boot-maven-plugin</artifactId>
			</plugin>
		</plugins>
	</build>

</project>
Spring Integration システム接続
このガイドでは、Spring Integration を使用して、RSS フィード (Spring ブログ) からデータを取得し、データを操作してファイルに書き込む単純なアプリケーションを作成するプロセスについて説明します。このガイドでは、従来の Spring Integration XML 構成を使用しています。他のガイドでは、Lambda 式の有無にかかわらず Java 構成と DSL を使用する方法を示しています。
構築するもの
従来の XML 構成を使用して、Spring Integration でフローを作成します。
必要なもの
約 15 分
Eclipse STS や IntelliJ IDEA のような任意の IDE または VSCode のようなテキストエディター
Java 17 以降
コードを直接 IDE にインポートすることもできます。
本ガイドの完成までの流れ
ほとんどの Spring 入門ガイドと同様に、最初から始めて各ステップを完了するか、すでに慣れている場合は基本的なセットアップステップをバイパスできます。いずれにしても、最終的に動作するコードになります。
最初から始めるには、Spring Initializr から開始に進みます。
基本をスキップするには、次の手順を実行します。
このガイドのソースリポジトリをダウンロードして解凍するか、Git を使用してクローンを作成してください:
git clone https://github.com/spring-guides/gs-integration.gitgs-integration/initialに cd統合フローを定義するにジャンプしてください。
完了したときは、gs-integration/complete のコードに対して結果を確認できます。
Spring Initializr から開始
IDE を使用する場合はプロジェクト作成ウィザードを使用します。IDE を使用せずにコマンドラインなどで開発する場合は、この事前に初期化されたプロジェクトからプロジェクトを ZIP ファイルとしてダウンロードできます。このプロジェクトは、このチュートリアルの例に合うように構成されています。
プロジェクトを手動で初期化するには:
IDE のメニューまたはブラウザーから Spring Initializr を開きます。アプリケーションに必要なすべての依存関係を取り込み、ほとんどのセットアップを行います。
Gradle または Maven のいずれかと、使用する言語を選択します。このガイドは、Java を選択したことを前提としています。
依存関係をクリックして、Spring Integration を選択します。
生成をクリックします。
結果の ZIP ファイルをダウンロードします。これは、選択して構成された Web アプリケーションのアーカイブです。
| Eclipse や IntelliJ のような IDE は新規プロジェクト作成ウィザードから Spring Initializr の機能が使用できるため、手動での ZIP ファイルのダウンロードやインポートは不要です。 |
| プロジェクトを Github からフォークして、IDE または他のエディターで開くこともできます。 |
ビルドファイルに追加する
この例では、2 つの依存関係を追加する必要があります。
spring-integration-feedspring-integration-file
次のリストは、最終的な pom.xml ファイルを示しています。
次のリストは、最終的な build.gradle ファイルを示しています。
plugins {
	id 'org.springframework.boot' version '3.5.16'
	id 'java'
	id 'io.spring.dependency-management' version '1.1.7'
}


group = 'com.example'
version = '0.0.1-SNAPSHOT'

java {
	sourceCompatibility = '17'
}

repositories {
	mavenCentral()
}

dependencies {
	implementation 'org.springframework.boot:spring-boot-starter-integration'
	implementation 'org.springframework.integration:spring-integration-feed'
	implementation 'org.springframework.integration:spring-integration-file'
	testImplementation('org.springframework.boot:spring-boot-starter-test')
	testImplementation 'org.springframework.integration:spring-integration-test'
}

test {
	useJUnitPlatform()
}
統合フローを定義する
このガイドのサンプルアプリケーションでは、次のような Spring Integration フローを定義します。
spring.io の RSS フィードからブログ投稿を読み取ります。
投稿のタイトルと投稿の URL で構成される、読みやすい
Stringに変換します。その
Stringをファイルの末尾(/tmp/si/SpringBlog)に追加します。
統合フローを定義するには、Spring Integration の XML 名前空間のいくつかの要素を使用して Spring XML 構成を作成できます。具体的には、目的の統合フローのために、これらの Spring Integration 名前空間(コア、フィード、ファイル)の要素を操作します。(最後の 2 つを取得することが、Spring Initializr によって提供されるビルドファイルを変更する必要があった理由です。)
以下の XML 構成ファイル(src/main/resources/integration/integration.xml から)は、統合フローを定義します。
<?xml version="1.0" encoding="UTF-8"?>
<beans xmlns="http://www.springframework.org/schema/beans"
	xmlns:xsi="http://www.w3.org/2001/XMLSchema-instance"
	xmlns:int="http://www.springframework.org/schema/integration"
	xmlns:file="http://www.springframework.org/schema/integration/file"
	xmlns:feed="http://www.springframework.org/schema/integration/feed"
	xsi:schemaLocation="http://www.springframework.org/schema/integration/feed https://www.springframework.org/schema/integration/feed/spring-integration-feed.xsd
		http://www.springframework.org/schema/beans https://www.springframework.org/schema/beans/spring-beans.xsd
		http://www.springframework.org/schema/integration/file https://www.springframework.org/schema/integration/file/spring-integration-file.xsd
		http://www.springframework.org/schema/integration https://www.springframework.org/schema/integration/spring-integration.xsd">

    <feed:inbound-channel-adapter id="news" url="https://spring.io/blog.atom" auto-startup="${auto.startup:true}">
        <int:poller fixed-rate="5000"/>
    </feed:inbound-channel-adapter>

    <int:transformer
            input-channel="news"
            expression="payload.title + ' @ ' + payload.link + '#{systemProperties['line.separator']}'"
            output-channel="file"/>

    <file:outbound-channel-adapter id="file"
            mode="APPEND"
            charset="UTF-8"
            directory="/tmp/si"
            filename-generator-expression="'${feed.file.name:SpringBlog}'"/>

</beans>
ここでは、3 つの統合要素が関係しています。
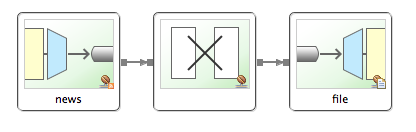
<feed:inbound-channel-adapter>: ポーリングごとに 1 つずつ、投稿を取得する受信アダプター。ここで構成されているように、5 秒ごとにポーリングします。投稿は、news(アダプターの ID に対応)という名前のチャネルに配置されます。<int:transformer>:newsチャネルのエントリ(com.rometools.rome.feed.synd.SyndEntry)を変換し、エントリのタイトル(payload.title)とリンク(payload.link)を抽出し、読み取り可能なStringに連結(および改行を追加)します。Stringは、fileという名前の出力チャネルに送信されます。<file:outbound-channel-adapter>: チャネル(fileという名前)からコンテンツをコンテンツに書き込む送信チャネルアダプター。具体的には、ここで構成されているように、fileチャネルのすべてを/tmp/si/SpringBlogのファイルに追加します。
次の図は、この単純なフローを示しています。
auto-startup 属性は今のところ無視してください。後でテストについて説明するときに、それについて再確認します。今のところ、デフォルトでは true であることに注意してください。これは、アプリケーションの起動時に投稿が取得されることを意味します。filename-generator-expression のプロパティプレースホルダーにも注意してください。これは、デフォルトが SpringBlog ですが、プロパティで上書きできることを意味します。
アプリケーションを実行可能にする
Spring Integration フローをより大きなアプリケーション(おそらく Web アプリケーション)内で構成することは一般的ですが、より単純なスタンドアロンアプリケーションで定義できない理由はありません。次に行うことは、統合フローを開始し、統合フローをサポートする少数の Bean を宣言するメインクラスを作成することです。また、アプリケーションをスタンドアロンの実行可能 JAR ファイルにビルドします。Spring Boot の @SpringBootApplication アノテーションを使用して、アプリケーションコンテキストを作成します。このガイドでは統合フローに XML 名前空間を使用するため、@ImportResource アノテーションを使用してアプリケーションコンテキストにロードする必要があります。次のリスト(src/main/java/com/example/integration/IntegrationApplication.java から)は、アプリケーションファイルを示しています。
package com.example.integration;

import org.springframework.boot.SpringApplication;
import org.springframework.boot.autoconfigure.SpringBootApplication;
import org.springframework.context.ConfigurableApplicationContext;
import org.springframework.context.annotation.ImportResource;

@SpringBootApplication
@ImportResource("/integration/integration.xml")
public class IntegrationApplication {
  public static void main(String[] args) throws Exception {
    ConfigurableApplicationContext ctx = new SpringApplication(IntegrationApplication.class).run(args);
    System.out.println("Hit Enter to terminate");
    System.in.read();
    ctx.close();
  }

}
実行可能 JAR を構築する
コマンドラインから Gradle または Maven を使用してアプリケーションを実行できます。必要なすべての依存関係、クラス、リソースを含む単一の実行可能 JAR ファイルを構築して実行することもできます。実行可能な jar を構築すると、開発ライフサイクル全体、さまざまな環境などで、アプリケーションとしてサービスを簡単に提供、バージョン管理、デプロイできます。
Gradle を使用する場合、./gradlew bootRun を使用してアプリケーションを実行できます。または、次のように、./gradlew build を使用して JAR ファイルをビルドしてから、JAR ファイルを実行できます。
Maven を使用する場合、./mvnw spring-boot:run を使用してアプリケーションを実行できます。または、次のように、./mvnw clean package で JAR ファイルをビルドしてから、JAR ファイルを実行できます。
アプリケーションの実行
これで、次のコマンドを実行して、jar からアプリケーションを実行できます。
java -jar build/libs/{project_id}-0.0.1-SNAPSHOT.jar

... app starts up ...
アプリケーションが起動すると、RSS フィードに接続し、ブログ投稿の取得を開始します。アプリケーションは、ユーザーが定義した統合フローを介してそれらの投稿を処理し、最終的に投稿情報を /tmp/si/SpringBlog のファイルに追加します。
アプリケーションがしばらく実行された後、/tmp/si/SpringBlog でファイルを表示して、少数の投稿からのデータを表示できるはずです。UNIX ベースのオペレーティングシステムでは、次のコマンドを実行して、ファイルを tail して、書き込まれた結果を確認することもできます。
tail -f /tmp/si/SpringBlog次のサンプル出力のようなものが表示されるはずです(ただし、実際のニュースは異なります)。
Spring Integration Java DSL 1.0 GA Released @ https://spring.io/blog/2014/11/24/spring-integration-java-dsl-1-0-ga-released
This Week in Spring - November 25th, 2014 @ https://spring.io/blog/2014/11/25/this-week-in-spring-november-25th-2014
Spring Integration Java DSL: Line by line tutorial @ https://spring.io/blog/2014/11/25/spring-integration-java-dsl-line-by-line-tutorial
Spring for Apache Hadoop 2.1.0.M2 Released @ https://spring.io/blog/2014/11/14/spring-for-apache-hadoop-2-1-0-m2-released
テスト
complete プロジェクトを調べると、src/test/java/com/example/integration/FlowTests.java にテストケースが表示されます。
package com.example.integration;

import static org.assertj.core.api.Assertions.assertThat;

import java.io.BufferedReader;
import java.io.File;
import java.io.FileReader;

import org.junit.jupiter.api.Test;

import org.springframework.beans.factory.annotation.Autowired;
import org.springframework.boot.test.context.SpringBootTest;
import org.springframework.integration.endpoint.SourcePollingChannelAdapter;
import org.springframework.integration.support.MessageBuilder;
import org.springframework.messaging.MessageChannel;

import com.rometools.rome.feed.synd.SyndEntryImpl;

@SpringBootTest({ "auto.startup=false",   // we don't want to start the real feed
          "feed.file.name=Test" })   // use a different file
public class FlowTests {

  @Autowired
  private SourcePollingChannelAdapter newsAdapter;

  @Autowired
  private MessageChannel news;

  @Test
  public void test() throws Exception {
    assertThat(this.newsAdapter.isRunning()).isFalse();
    SyndEntryImpl syndEntry = new SyndEntryImpl();
    syndEntry.setTitle("Test Title");
    syndEntry.setLink("http://characters/frodo");
    File out = new File("/tmp/si/Test");
    out.delete();
    assertThat(out.exists()).isFalse();
    this.news.send(MessageBuilder.withPayload(syndEntry).build());
    assertThat(out.exists()).isTrue();
    BufferedReader br = new BufferedReader(new FileReader(out));
    String line = br.readLine();
    assertThat(line).isEqualTo("Test Title @ http://characters/frodo");
    br.close();
    out.delete();
  }

}
このテストでは、Spring Boot のテストサポートを使用して、auto.startup という名前のプロパティを false に設定します。一般的に、特に CI 環境では、テストのためにネットワーク接続に依存することはお勧めできません。代わりに、フィードアダプターが起動しないようにし、SyndEntry を news チャネルに挿入して、残りのフローで処理できるようにします。また、テストは feed.file.name を設定して、テストが別のファイルに書き込むようにします。それから:
アダプターが停止していることを確認します。
テスト
SyndEntryを作成します。テスト出力ファイルを削除します(存在する場合)。
メッセージを送信します。
ファイルが存在することを確認します。
ファイルを読み取り、データが期待どおりであることを確認します。
要約
おめでとう! Spring Integration を使用して spring.io からブログ投稿を取得し、処理し、ファイルに書き込む単純なアプリケーションを開発しました。
関連事項
次のガイドも役立ちます。
新しいガイドを作成したり、既存のガイドに貢献したいですか? 投稿ガイドラインを参照してください [GitHub] (英語) 。
| すべてのガイドは、コード用の ASLv2 ライセンス、およびドキュメント用の帰属表示、NoDerivatives クリエイティブコモンズライセンス (英語) でリリースされています。 |